
As that time of the year rolls around, everybody sets out to prepare for a whole lot of fun that’s on the way. Pumpkins, candy, and spooky decorations indicate the arrival of one of the best holidays of the year: Halloween. There are just so many things to look forward to; how can anyone not be thrilled? You probably started planning your costume weeks, or even months, in advance – not that we haven’t done the same. This is one tiny part of the year where adults can unleash their inner child and be whoever they want to be.
All that being said, if you’re here right now, that means you have one additional exciting thing to work on this Halloween. Planning a Halloween party brings so much joy that the process itself feels like a celebration. How should you decorate? What kind of food and snacks should you serve? Should you DIY your drinks or should you just pour out of the bottle? What kind of music should you play? What kind of games or activities should there be? The list goes on. Planning with meticulous detail still means you may forget one little thing: knockout invitations that make your invitees jump up and down in glee for having something awesome to do on Halloween. Okay, maybe it’s not so little. Your invites represent your party’s first impression and will build up an image of what it’s going to be like.
Where should you get started?
This article will help you overcome the essential element that is your invitation. Remember, just like your resume matters in scoring an interview, your invites matter in getting people to want to come to your party. Is that too much of an exaggeration? Well, let’s just change the subject and dive right in.

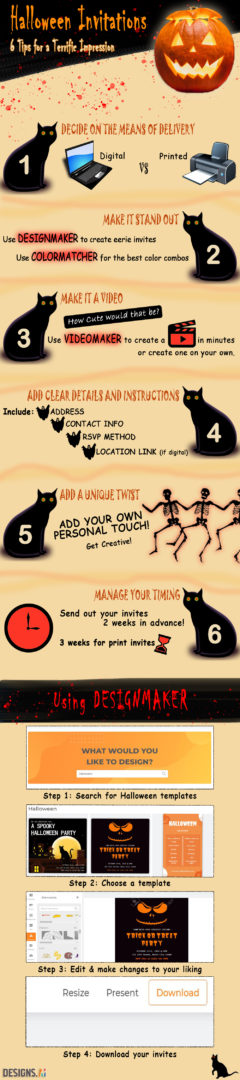
6 Tips for terrific party invitations
1. Decide the means
2. Make it stand out
3. Make it a video
4. Add clear details and instructions
5. Add your own unique touch
6. Manage your timing
Tip #1: Decide on the means of delivery
There may be many quirky ways to inform your guests about your party and ask them to specify if they’re coming, but getting too unconventional may not be the best choice if you don’t have much time to prepare and execute. You may want to stick with your best 2 options: digital or printed. You have an astonishing amount of room for creativity with just these 2 options. The easiest and most convenient way to do it is to go for digital, but if you’re feeling extra bold, you can mail out invitation cards. For printed invites, you need a list of your guests’ mailing addresses, or you can hand them out to them yourself. It’s time-consuming but adorably traditional. Alternatively, you can use both methods – digital and printed – with one single design by using an adaptive design tool that lets you change dimensions easily and quickly without ruining the layout of your design.

Tip #2: Make it stand out
If you want to really create that amazing first impression, you need to step up your design game. If you’re not a pro, creating a Halloween party invite template can seem like a daunting task. There is an easy way out in that case. Of course, you can always just drag and drop items and change everything at a click of your mouse with easy design tools like the Designmaker, but if you want it to be even simpler than that, you can choose from beautifully, ready-made templates made by the design-gifted. Use a color matching tool to find the best color combination for your invites after figuring out the overall look you’re going for. The whole process will be done in the blink of an eye because it’s just that easy. See it for yourself!

Whatever your party’s going to be like should be reflected in your invite, so go above and beyond just making it pretty. You’d want to project that your party is the party to be at. Ask yourself questions like “Is my party kid-friendly?” and “Am I aiming for creepy or cute?” to help with getting a better grasp of what you should aim for.

For example, the invite below not only instills excitement because it’s different from a normal “you’re invited to my Halloween party”, but it also clearly conveys the mood and theme of the party so that people know what to expect.

Tip #3: Make it a video
If you decide to send out your invites digitally, you can even make it a video. Videos are more expressive and can be fun to watch! Wow your invitees with something they’ll watch more than once. If you have the time and the skills, you can make your own customized video, but if you don’t want to spend hours and days getting it right, you should use a simple video editing tool, like the Videomaker. Enhanced with AI technology, you can create your video in minutes, without the need for heavy editing, background music integration, or even voice recording. Of course, you can choose to add your own media and edit the video yourself, but if you choose to, you can simply upload your script, and the software will do the rest of the work.

After submitting your script, all you have to do is pick your industry, then a voice for your voiceover and voila, you have your end product! You can easily make changes to the AI-picked clips or images, if you want to, by clicking on it and choosing a different option on the left sidebar. Once finished, you can send your video out as your invitation.
Tip #4: Add clear details and instructions
You have a great design now and you’re good to go, but details and instructions play the most vital part for an impactful invite. Make sure you add your address and contact number clearly, with a location link if you decide to opt for digital invitations. Additionally, state the date of the party noticeably and add the day of the week for good measure to avoid people canceling out because they “didn’t notice it was on a Wednesday night.” Lastly, include the RSVP method to ensure a smooth process. You can use a Google form or just ask everyone to send a brain emoji in reply if they’re attending, as examples. If you need everyone to fully dress up, mention it in your invitation, and if there’s something they should bring or do, don’t forget to point it out. Everything your guests should know must be outlined in the invite.

Tip #5: Add a unique twist
Now that design and essential details are out of the way, let’s talk about adding a twist. The possibilities are endless when it comes to adding your personal touch to your invites. Let your personality shine through and don’t shy away from weird ideas that pop into your head. You could do things like a riddle or an equation to complete the venue address or an unexpected RSVP method – as long as it doesn’t make it hard for you to keep track of your attendees. It can be something super unusual and original, such as an RSVP basket everyone can drop their responses in or a short video of your invitees doing a little dance to a song you picked, or it can be as simple as asking your guests to tell you the character they’ll be dressing up as to confirm their presence.

Tip #6: Manage your timing
Finally, you need to pay attention to timing. Your guests should be given enough time to process your invitation, check out other possible options, and reply to you. Not to forget, if you send out your invites too close to Halloween day, then most people may have already made plans and wouldn’t be able to make it to your party. To avoid disappointment, plan things out and send out your invites 2 weeks before Halloween so that your guests don’t end up making other plans. Apart from that, you’re going to need an appropriate time window to finalize your attending guest list and arrange for party supplies accordingly. For printed invitations, you might want to start even earlier to accommodate to mailing times and procrastinators.

It’s time to get to work
Creating your own Halloween invitations doesn’t have to be complicated or time-consuming. Whether you decide to make it a printed card, an image, or a video, the creation process can be quick if you use the right tools. It’s important to remember to jot down and organize all the details that need to be included to avoid leaving anything out. For a more outstanding experience, add your own unique touch to the invites, and not just in terms of design! The most important thing is to have fun with it and make the creation process as memorable for yourself as it will be for your guests.
Why use a tool like DESIGNS.AI?
If you don’t have a lot of experience using complex photo or video editing tools, your Halloween invitations may not only come out looking less amazing than you imagined, but it will take a lot of time to create them. Using the power of Artificial Intelligence, our platform provides the gift of designing faster and smarter. You can have your Halloween invitations ready within minutes, with the use of professionally made ready-to-use templates that are customizable. All the tools you need are gathered in one platform to make your design experience one you enjoy.
Read More: